Tuesday, December 23, 2008

Open House Around the World

Come on in to my Open House!
I know that the Internet world can be slow during the holidays as rubber stampers are maxed out on stamping and busy with activities. Yet some of us have moments where we would like to enjoy seeing what other stampers are doing. So I created this Open House to share some of my home and community's holiday traditions with you. I announced it as a swap at the Stamp Shack. Nine other bloggers have joined in this Open House with posts to share their holiday traditions from their corner of the world.


Welcome to Fairbanks, Alaska!
Thanks for stopping in...please help yourself to some goodies!

Let me begin by showing you around my town. Know you can double click most blog photos if you want to see something larger.


Recently it has been about zero degrees F most days but no wind - unlike many other places. We are enjoyng a much milder season than in many years. Of course the snow came at the beginning of October and we can expect it to be with us until at least the end of March.

We celebrated solstice last weekend and are thrilled to now be gaining sunlight. We have 3 hours and 49 minutes of daylight today and will gain another 59 more seconds of daylight tomorrow!
A river runs through the center of town with decorative displays on both sides of the banks. These pictures were taken at about 10 o'clock last Saturday morning. I used no flash so you could see the beginning of daylight.

The Northern Wind blows some light onto the riverboat. Lots of lighted characters fill the plaza across the river adding brightness to our dark days.


Ice carvings are a big part of our community’s holiday decorations. The polar bear, aka Nanook, is the mascot of the University of Alaska-Fairbanks.


Dancer and Prancer welcomes us to North Pole, Alaska…just a 20 minute ride down the road.


Of course Santa Claus House is the big attraction in North Pole.


One of my personal favorite traditions is finding some quiet of the winter to enjoy making and mailing lots of holiday cards. These highbush cranberries are enjoying their own special quiet.


This year brought a new challenge as the electric was off for over 6 hours one Sunday during prime writing time. So like the pioneers before me I wrote many cards by candlelight huddled under a blanket.


I truly enjoyed making this peaceful resist card.
I made many other cards this season but this became my personal favorite...I love using a resist technique.


Many stamping friends from around the world shared beautiful holiday greetings. Many thanks to all!!

I enjoy cooking and sharing time with friends. Please help yourself and take a few seconds to look at how this ice bowl is made. Two stainless steel mixing bowls, with about a half to one inch space between the rims, are taped together and filled with water, greenry, flowers, and fruit. The whole thing is then frozen outside in nature's freezer. Bring inside and warm up so the ice bowl is released.

I am sorry you are running out of time but there is one last thing I must show you before you leave. Look at my favorite manger scene. It incorporates many different Alaska native cultures in traditional dress. You really must plan to visit again next year since there still is so much to see. Please leave me a comment for I have a doorprize for one randomly selected visitor.

Thanks for stopping in and sharing my holiday!

I wish you a most wonderful holiday season!

The next Open House stop is Mrs. Fence in Maine.

Friday, December 5, 2008

A Christmas Tradition

Tim Holtz is busy posting his tutorials for 12 days of Christmas tags. You don't want to miss this chance to see new ways of using supplies by a master teacher!
I thoroughly enjoyed working on the tutorials last holiday and have enjoyed the first 3 so far this season.

This first tag features Tim's new masks. They are very large in size but this shows how they can be used effectively on smaller items too. I love Tim's technique of spritzing the distress ink to allow it lightly color and soften the look of the mask. Also tried out some new grungeboard from his botanical set with the new distress stickles. What a fun tutorial to give a jump start on the holidays.


Tag 2 features a variety of blue alcohol inks and silver mixture spread on a craft sheet with glossy paper moved on top. Also used a splatter brush to add some white flecks over all (very difficult to see in this picture).


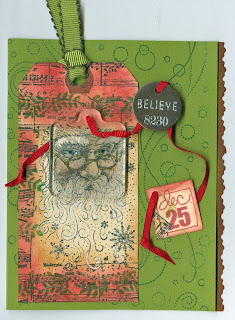
Tag #3 features the use of a fragment piece to spotlight Santa's face and one of Tim's metal tags. This new combination of stamped images for me was lots of fun and of course playing with the distress inks and Inkessentials white pen.

Thanks for looking...and know I hope to follow several more tutorials during the 12 days so stop back soon.

Sunday, November 16, 2008

Thanks to my creative friends!


I want to shout out one BIG THANK YOU for the many birthday cards that were sent last month from my creative friends. Wow what a treat! For a full month my mailbox was filled every day with the most creative fun mail! Many, many thanks to each cyberfriend! You are the BEST!


A Touch of Christmas bling


I have been away enjoying some time Outside (yes-that is how our newspaper refers to the "lower 48 states") with my family. It was hard to believe that while we have had snow on the ground since late September, Ohio was still enjoying temperatures in the 70's and many colorful leaves on the trees. We had a great time and enjoyed some early celebrations for my birthday and Thanksgiving. A big thanks to my family!


After being away from stamping of course I had to checkout the Hero Arts challenges. This week features challenges for a broad range of techniques.

Of course I love any kind of resist work. I had to try out some new bling I purchased-Rangers Embossing Tinsel. It is chunkier than regular embossing and is really catches the eye. Wonderful stuff!!


I also tried out some of the new Hero Arts acrylic stamps. For this last card I embossed a grungeboard disk in the cuttlebug.
This little bird is carrying a wish token...Hope you too are having fun as you begin to prepare for this holiday season.

Tuesday, October 28, 2008

Shimmerz


I am still trying out some new things for Christmas cards. Here I tried a new product called Shimmerz. It is a thin watercolor paint with mica. It dries very quickly and adds a shimmer when you tilt your card. I used a white layer of "angel wings" shimmerz on the the ornaments in this card. I know you can't see it so why don't you head over to the home site so you can enter you name for the blog candy that will be released on Nov 1st (see post for Wed Oct 22 Colors and Candy).

I began this card with a watercolor wash for the background. Embossed the ornaments with Ranger Seafoam white embossing powder so I use a embossed resist technique to color them. One oops-I tried to make 3 different colored balls but the background yellow tones turned my blue ink into green. Greenry stamps are from the SU Peaceful Wishes set and the ornaments are in a River City set.

Sunday, October 19, 2008

Winter is Here


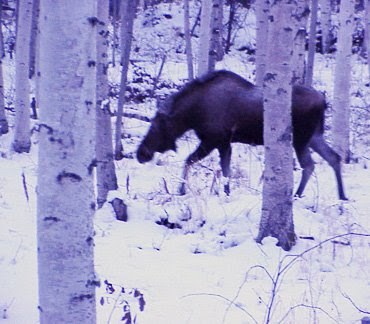
It is a quiet Sunday. Our leaves are gone and snow has covered the ground since the end of September. All day I was thinking I should get out and take some new photos for my blog but I spent the day stamping instead. But in late afternoon a moose walked through on the path through the birch trees.
A community marathon uses this trail every September in celebration of the Equinox. Hundreds enjoy the challenge of this race that's said to be one of the most rigorous in the world.
Melinda Gates joined a relay team for the 2nd year to honor the memory of past Iditarod champion Susan Butcher. The racers and walkers take almost 1 hour to all pass through my property. It has become a ritual to greet them and cheer them on. But for now it is the moose who enjoys the quiet of the afternoon.

Friday, October 17, 2008

Challenge fun!


Hero Arts' blog is focusing on printed papers this week.
Since I generally do not use many PP, I have enjoyed learning a few tips this week. During the World Card Making Day I was introduced to a new to me sketch site, Triple the Sketch. So with today's sketch post I decided to combined both. I had to adjust the sketch to work on my card.
I used Basic Grey and Memory Box papers. The snowflake stamp is from Stamp Oasis. The image is embossed on a glitter mist background. The Hero Arts sentiment and seal are overlayed on the cuttlebugged circle.
Remember you can double click on any picture to see more details.
Thanks for looking!

Harry smiles!


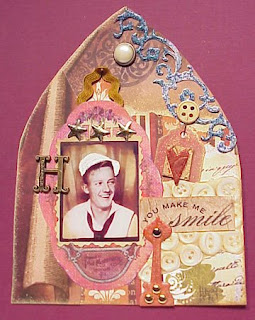
Many thanks to Lianna for hosting a very challenging swap. She sent the participants in her challenge several collage elements and asked us to use 3 in making a card, a postcard or an arch. I used the pearl at the top of the arch, Harry's photo, the paper behind it that I used as a framing mat also the button straight pin and the paper I stamped the sentiment on. The long scroll die cut was make with the CB and the bottom hinge arrow and the little heart are grungeboard element. I 've only made a couple arches but this was a fun challenge--for me it was like creating my own jigsaw puzzle. Thanks again Lianna!

Saturday, October 4, 2008

World stamping day challenge


Tons of challenges are happening all over the net to celebrate our special card making day! Hope you are find challenges that you are enjoying.


My friend Jennifer threw out this challenge last week-to use a bottle label to make a card. I must say with a little hot water soak it came off lots easier than I ever expected. I cut the design out of the bottle cap to use as an embellishment. It is a little hard to see in the picture but it is a large dark image of a mama polar bear with a lighter image baby bear...and it is our "Made in Alaska" trademark that is purchase by locals to designate products that are truly made here.

I have been on a few other challenges too-
Wonderful Women was an eye catching challenge for me at 2 peas. This one also qualified for the 2 or more mingled flourishes and some doodling!

I wanted to begin working on some Christmas cards so I am also playing over at Scrapbook News and Review. You have to register to play but it is free.

For this card I used the Blue Christmas inspiration photo. I made a homemade glimmer mist background. It shimmers with gold flakes.

This contest at SRN was sponsored by Apple Blossom Studio Stamps and required a border. I am off and running to play some more!


Thursday, October 2, 2008

Deck the Halls

The Hero Arts blog challenge this week is to create items to use to decorate for the holidays.

This idea was shared by the our dear stamping friend from PCMB and Two Peas , the late dear who moi. Sent to me by Lori on March 9, 2005. The directions are generic in order to accomodate various box sizes.
This simple box cover is constructed from heavy weight white cardstock. Begin with a 7" square to creating the lid. Scoring 1.25 inches in from other edge on all sides. Stamp as you desired. The tissue oval hole is made by using the tissue box as a template. To create the side of the lid cut one scoring seam on each corner and tape the short flap underneath the lid. The base wrap begins with 2- 5x11.5 pieces of cardstock. Wrap each piece on the outside of the box to create 2 side panels and to provide a seam allowance for taping underneath the other sheet's panel to connect all 4 panels together. Cut away excess and leave flat for stamping. Notes- some box panels on the same box are slightly different widths. This pattern does not cover the bottom of the box.

I layered blue distress ink to create a background for the falling snowflakes (CL Classic Christmas borders-new Hero Arts Winter catalogue). I consider the Three Snowy Trees stamps one on my very favorite HA stamps which I have enjoyed each year since 2000. I used liquid applique for the snow. Added lots of glitter on the snowy tree boughs.


I used 12 x12 gold metallic cardstock to make this votive box large enough to enjoy this collage stamp. I scored the paper in 4" blocks and cut away the corner squares all except for a tape allowance stripe broading each of the 4 panels by a 1/4 to 1/2 inch depending on the tape width. I stamped the image onto vellum with Nick Bantock's prussian blue dye ink and embossed in clear. I used metallic dabbers to paint the frame and embellished. The best part of all is I found a battery operated tealight candle-that flickers!...so this is safe around animals and children. This image is so beautiful on vellum-I need to go play more!


Saturday, September 27, 2008

First Christmas project takes shape

I am excited about completing my first Christmas project of the season. This tea box is fast and inexpensive to make. I had everything except the embossed paper mache box which I found at JoAnn's for $1. I am thinking this gift box will make a perfect size for a small stash of tea for my friend's office desk-(nicely holds 6 smaller size teabag packets).


I began with 1 layer of Ranger's Dabber Acrylic Pearl Paint- for the basecoat on the entire box. The dabber sponge top made an easy job of highlighting the tops of the embossing and box edges.


All images on the box top are heat embossed. I used the HA clear- tea for two set as the focal images. Sharpie markers worked best for coloring and stickles were add sparkle for the steam.


I also worked on these scraplings. I began by running the labels thru the CB with the swiss dot embossing folder with it partially inked. Stamped the images and put the snowman on pop dots.

Ah-h we have 2 inches of snow this morning...more will soon be here. Time for more holiday projects!

Tuesday, September 23, 2008

Time for making Christmas Cards

Last week Hero Arts threw out a great challenge to encourage me to get started with some holiday cards. I pulled out my Christmas stamps to try Sheri Carroll's Shabby Chic's tips. This is not a specific style that I have worked to achieve in the past so it was indeed a challenge for me.
My first idea was to recycle a coffee cup sleeve.
After all I feel recycling is very chic! The sleeve has such a wonderful texture I had been wanting to create something fun with one. The background is metallic gold dabber with lots of sticklers. HA Stamp, punch table cloth and embellishments. I added a little pocket to inside to make it a gift card holder.


Here I used a plain wooden ornament for my jumping off point. Crackle paint, metallic dabbers, and distress ink were all used on the snowflake...and then more sparkle and pearls to finish it off. The outside backgrond paper was put through the cuttlebug with distress ink.


At the last moment I decided I just had to try combining this collage stamp with some the button printed paper that I had hanging out for quite a while.

Hmm now the dilemma--now I am ready to start Christmas stamping but I don't feel I have enjoyed my fall and Thanksgiving stamps enough....could my answer be to just take the week off work? Oh how I can wish!

Monday, September 15, 2008


Ah-h the leaves are swirly in the breeze and gently floating to the ground as only a few geese remain behind...
Mother Nature is such a special inspiration for me. I continue to play with the cuttlebug and alcohol inks.
The new picture on the header is taken in my neighborhood and the one in the sidebar is of my drive. Please remember when you look at the thin spruce trees that their feet are buried in frozen soil. Yes, the forest here is mainly aspen, birch and spruce...so not a broad range of color.

Friday, September 12, 2008

What a terrific award!!!

Look at this fabulous award I received ~
I love sharing stamping & creative ideas with the community on the Internet. As our interests develop and grow in new directions it is possible to find a new group of folks that can support and encourage our talents and yet we can still stay connected with our beginning pals-even if it is just ever once in a while. Joni is a fabulously talented and creative friend and it is always fantastic to check in to see what she is doing at her blog Kix in Life! Joni, thank you so much for my award!
Equally special is making new friends. I have be playing with the Hero Arts group over on a Flicker website in one group that posts to participate in the HA blog group and also a cuttlebug group. This award was also presented to me by Gigi 001 (AKA Deborah) and known as Mimi on blog posts. Many thanks Gigi!.

Ta-dah I pass along this wonder award along to:
Christie is always trying some new techniques and having fun with stamping. Currently she in not in communication with us because her home in in the Hurricane Ike's territory. I am sure she would appreciate knowing other stampers were thinking of her.

Jennifer is from a family of professional seamstresses who continual shares her skills of putting just the right combinations together. No detail is too small for Jennifer to give it her all.

Kim is a very talented artist don't miss going to the bottom of her second page to see the broad scope of her world.
Phree is a new friend from Scotland. She is patiently sharing with me some things that are unique to her corner of the world.

Renu is one of those exceptional creative talents who always has a beautiful work.

Sherri is one of our most fabulous yakadackers at the stamp shack. She is passionate about playing and creating or most any kinda fun!
Stacy has a fabulous eye for color and details. Her work always has wonderful detailed embellishments which often includes stitching.

Tami creates non-stop stamping fun -an esty store, on-line zine writer, and a has prepared a wonderful alcohol ink class to share at her local stamping store and shares her samples.

Here are the instructions for award recipients:
1. Pick 7 of your favorite blogs
2. Winners can put the logo on their blog.
3. Link the person who gave your award to your blog.
4. Name the 7 that you are giving the award to with their links.
5. Leave a message on their blogs so that they know they've won!

Tuesday, September 9, 2008

Part II More cuttlebug play


Thanks Kim for throwing out the suggestion of trying out alcohol ink on metal! Oh I love metal and don't use it often enough. I saw your comment this morning and every time I had a spare moment today my mind was turning around how to give this a whirl.


Sometimes when I use AI on aluminum it does not give me the contrast I want and I end up covering the background with acrylic dabber paint or gesso which does not leave the metal look to be enjoyed. So I started this time with trying out the AI on small pieces of brass, aluminum and copper. The colors did their own polished stone effects and created fun backgrounds. I then run it through the CB and tried a couple methods of removing the AI from the embossed leaves. Of course blending solution works great but one must be careful not to have a tip of the rag remove it from the background at the same time the leaves are being cleaned. I personally liked my other solution...Sharpie markers also lift off AI so I did that to replace the color of the stems. I found success in cleaning the leaves with a quick pass of the Sharpie marker and an immediate wipe with a dry tissue. This left the leaves the beautiful natural golden brass color.

I gotta tell you this is fast become my favorite embossing folder! The embossed pieces can be used any direction. This close-up may have the image upside down from the folder but to me it looks a lot more like tree branches as opposed to the bush-likeness in the original direction. This little serendipity learning occurred while using the scraps to make the card above. This photo is somewhat better of the AI than the card but I tell you--just try it! Get your fingers a little inky. This larger piece will be a wall hanging but I gotta finish it another day.


When I first saw these landscape type embossing folders I wondered what I could possible do with them besides pumping out the same image over and over. Now I am glad I gave them a try and I am one my way to order some of the other seasonal ones too!

Thanks Kim for expanding the possibilities even further! And for any of you who don't frequent Kim's blog Running on Ink do know she is one fantastic, creative and immensely talented young woman. You just might want to check out what she is doing too.

Artsy Play with the Cuttlebug


I just bought 2 of the new landscape embossing folders (the Leaves and the Grass with single bird) and have spent some time playing with them. Here is some of my work.

For these 3 cards I used the technique of inking the inside top of the embossing folder and running it through the CB. The outside of the top of each CB folder has a little printed indentification which helps to quickly distinquish the top from bottom.

The leaves and branches are the color of the paper I selected. The ink added to the folder is the flat background. The thread like lines are created by allowing the ink pad edges to leave heavier ink lines on the folder.


Here I added some background lines with cut n dry sponge.


Also colored a little color to the leaves a little.


Not too much space for stamping...but I okay with that since I got to have some creative play time.

Monday, September 1, 2008

An ATC Matchbook Project

I am in a swap that requires using 1 stamp in 5 different ways. I am partnered with Sarah{loobylou}from the Stamp Shack for this swap. Sarah is a moderator at the Shack and helped me through many technical glitches which I created while doing work for the creative team. I am thankful that her schedule generally matched up with mine and she could solve my problems almost instantaneously. Sarah was my behind the scenes person who was there through every season! While I worked on the concept for these ATCs I was also inspired by the Hero Arts weekly challenge to create a book. I thought it would be added fun to combine these 2 projects since my 5 ATCs wouldn't fill the typical album page that Sarah stores them in. However she will have the option to lift the ATCs out if she so desires.


The front cover features the full image of the Hero Arts tree stamp from the Live Simply clear set. It is copper embossed and is colored with several inks to represent all the seasons. I used a fiskar's texture plate in my by cb for the background--many thanks to a RAK sent by Mary {swapin cards}!


This first ATC represents spring with a bird sitting in a hand drawn nest with 3 little sparkling gem eggs. The tree is colored with Tombow markers and the sky is stippled. A background stamp finishes with a tree bark look.

The summertime tree sparkles in the sunlight and is colored with spica pens. The background is created by putting dimensional pearls on the blending tool and twirling it in circles on the paper.


The fall ATC is a camouflaged look created with alcohol inks. A quail sits hidden in a pile of fall leaves.

An emboss resist technique was used to create the winter look with a fresh layer of snow on tree. The background is embossed with the cuttlebug.


The final ATC is the bird on the very top of the tree.
The background is lumiere paint tapped on black cs with a piece of a plastic shopping bag.
Thanks Sarah for all your wonderful help through all seasons! Hope you enjoy this little remembrance!